Pages

Tuesday, June 19, 2012

Refreshing Idea

photo taken from Pinterest
If you want to update an antique piece of furniture and create a style that feels more fresh, just pair it with a modern piece. By painting this antique console table a robin's egg blue and mixing it with a pair of silver lamps with black shades both pieces are enhanced. The contrast calls for your attention.
 This buffet server is a beautiful accent to the farmhouse table, and painted dining chairs. The server's color reflects a more updated current style, and the table has a more rustic casual look. The successful mixing of the gilt mirror has an older feel, but is accented with contemporary glass lamps. Each piece makes the other more interesting.

photo from House Beautiful
This dramatic dining room features an antique iron chandelier which sets over a bone concrete and iron base table and very contemporary Hamilton dining chairs. The 7' wide foxed-glass mirror is oversized and adds much drama and personality to the space. The contemporary glass column floor lamp adds sparkle to an otherwise empty corner. A sculpture made from a mounted piece of driftwood further adds to the contrast and appeal.


photo courtesy of houzz.com
This bath is another great example of mixing something old with new. By using a painted open shelf vanity with chrome fixtures and contemporary lighting, and combining it with a distressed painted wood mirror and a weathered shutter cabinet a simple yet interesting design is achieved. This bath evokes a great sence of personality and each piece draws you into the space and makes it warm and inviting.
While this bedroom is soft and subtle in color, the  textural richness of the modern bed set next to those beautiful end tables, and ceramic lamps, is in sharp contrast to the old farmhouse style feel of the wood paneled walls. The addition of the modern geometric rug adds another layer of interest.

photo from House Beautiful
So whether you create a subtle color pallet or use more color and contrast from white to black, the idea of combining some old with something new, or something ordinary mixed with something fancy or ornate the results can be quite fantastic. This bedroom is accessorized with old/new decor and the main pieces of furniture are classic in design.

So the next time you want to update a room's design and feel, try mixing something old with something new, or something grand with something very simple. I think you will be pleased with the results.
Post a comment and let me know what you think...it will make my day!

Until next time.......


Saturday, June 2, 2012

Chair Transformation in Six Steps

It is so rewarding to find a tired and worn out piece of furniture and then come up with an idea or two and give it a complete makeover. Many times the piece is still solid and sturdy, but has just been neglected. When I discovered this little jem I couldn't wait to find an inspiring fabric and paint color.
Here is the before so you can see she had "great bones" or style.

100 year old chair and still going strong!
Step 1:CLEAN. I cleaned this chair first with a soft brush to remove cobwebs and dirt. Then I wiped it down with a soapy cloth to remove the rest of the dust/dirt.

Step 2:PRIME. Next I primed the bare spots with Kilz spray and let dry for 20 minutes. This helps the paint stick and stay on.

Step 3: PAINT. I sprayed several light coats of Valspar (Lowes) Avacado green spray paint (the color is actually more vivid and richer than it shows...the sun is washing it out a bit!). Lowe's has some new fun colors...much needed in the spray paint world! I let it dry overnight and then gave it a spray finish coat to extend the life of the finish.

Step 4:Cushion. Due to the fact that the cushion had a spring in it, I decided to just add a high density cushion to it making it 5" thick. No fun having an uncomfortable wicker chair!

Step 5: Fabric. Finding the fabric was the fun part and gave me the color inspiration. Beautiful colors of blues, greens, and some yellow. This fabric is a "sunbrella" type so will hold up to use and some abuse.

So here is the finished piece!


Ready for a new home or cottage!

great style and comfortable too!


6 Easy steps that transforms and brings life into any piece of old furniture! 
Stop back and see some lamp makeovers I did recently. I will be sharing with you soon. Thank you for visiting my blog, and be sure to leave me a comment. I love to know what you think.
Until next time enjoy this day....


Monday, May 14, 2012

Yellow Bench: "Before & After"

Hope all you mother's out there had a wonderful Mother's Day, I know I did! I am very blessed to have two wonderful children. I got to spend the day with my family and some time outside doing some gardening. It was a spectacularly beautiful day!
The new consignment store I am apart of had a fantastic opening weekend- a huge success. Time to get cranking on some more projects as this weekend it is Arts in Ada!
Onto the subject at hand...I get sidetracked easily these days!
I thought I would show you a "before & after" project I recently finished. First the "after" on this one. I know some people skip right to the "after" and then go back to the "before" anyway (I'm guilty of this one myself).    "The After"...
Glazed Yellow Bench

The other reason for doing it this way is you will appreciate the facelift this piece was given by seeing how adorable it is now and how it was an ugly duckling before. 
"The Before"


 a seriously ugly and smelly tapestry fabric!


I could see the potential. The bench was very sturdy and had nice lines and a sweet detail on the legs. But really the fabric was beyond hideous, especially mixed with a copper-colored metallic paint!!! Oh dear what were they thinking?? Anyways after sanding and painting a great dirty yellow color I decided to take it to the next step...add some dark glazing to enhance the detail and give it a european flair. A finish coat finished it off and I just love how it turned out!
                                                                    Here it is again!

Stop back soon to see another finished piece of furniture and lamp too! I just love warm weather it is the best for painting. 
Thanks for stopping by and leave me a comment...it makes my day!


Monday, May 7, 2012

Flea Market Finds

...rainy days and Mondays... 

Weekend furniture & decor finds! Hope you enjoyed your weekend. I had a fun & busy one. First, I spent time each day adding to my consignment booth at Cranberry Hill (glad I did most of the moving on Thursday- the weather was unpredictable). I needed to bring a few more things in to fill the space before the open house this Thursday (May 10). I was suprised how much the small-ish space could hold-lovely!
closer to being finished, but I added more on Sunday with my daughter Brittany! Pictures to come later.
Then, I also squeezed in an estate sale on Friday...nice stuff but expensive...not repurpose material...expensive home material. After that I stumbled upon a neighborhood sale~BINGO. When I can find a antique wicker chair that is probably 100 years old for only $27 w/ pillows & a throw thrown in, it's next to impossible to pass up.! Here are some of the "before" pictures you will have to stop back for the "afters":
This 100 yr old chair came from a lakeside cottage!
And then there was this fun lamp...

I'm thinking a drum shade and a
decorative finial would be cute.
The shape is fun and the center
is ceramic mixed with the antique
brass. I'll have to do some
thinking if I want to change the
finish. I'll ponder a bit.


My mom & I stopped at another sale where I found these 2 chairs- of course they need a bit of work- namely a seat, a cushion, fabric & paint! But that's what I like to do. The good news is that I only paid $10 for both-WOW! They are solid wood chairs and sturdy~antique furniture was built to last a while.
Finally, on Saturday my mom's friend was having a sale called (yes she named her sale) The Great "Hoe Out"!!!, complete with grilled hotdogs, chips, and bottled water~ too fun! I stumbled upon this awesome frame. I wasn't really thinking I would keep the picture in it at first. When I got it home my husband said I should just sell it as is....might look pretty random in my spot...I'll just have to see.

What do you think? Keep as is or update...tell me what you think should happen to it.
Stop back and visit again! Thanks for the encouraging comments on my facebook page. Feel free to leave them here as well...I love to hear from you!

Friday, May 4, 2012

A Sneek Peek

 
Chippy paint on a solid pine table~love the legs on this one.


Gathering some more things to take to Cranberry Hill today. I'll give you a sneek peek at a few things, but to get the full effect you need to see the them in person and take in the whole experience. It is a very sweet place filled with great little treasures. And it is right next door to an ice cream shop. The two seem to go together pretty nicely...shopping & ice cream. Well here they are.........
 
all ready for a sunroom or cottage!

 A magnetic message board for a world traveler...or a want-a-be traveler


A couple more examples of my magnetic photo boards, great for those who like to change their photo's often~without the hassel.

Then just for fun I thought I would show you two critter photo's.

"Woody" the woodchuck!

and my favorite animal
Bailey aka Critter Control!

I'll keep an eye on them for ya.

Thursday, May 3, 2012

Modern Twist Moving Day

OPEN HOUSE IS THURSDAY MAY 10, 10AM-8PM
I am so excited I recently joined a home decor consignment boutique in Ada! It is an adorable place with a great variety of consigners. It has a very artsy vibe~ I think it will be a great group to be apart of. My repurposed, updated, and polished up salvaged things will have a new place to be displayed. It is called Cranberry Hill Consignment Co. and is right on Ada Dr near Thornapple Rd. Sorry I have been a bit MIA lately, I have been feverishly working from morning to night putting the finishing touches on some furniture & accessories.

Adorable wicker table & awesome lamp find (with a few upgrades!)


This is just a sampling of what I am bringing there. I have also been busy making more message boards and magnetic photo boards.


Magnetic Photo Boards

 Last count I have over 30 items that will be displayed. Affordable items at unbelievable prices! One of a kind things! Stay tuned for more postings. I took a bunch of pictures today!

Just love the lines of this vintage Chair...one of my favorite make overs

 Time to start setting up......
Stop back soon!

Thursday, April 12, 2012

Asian Inspired Color & Design


Color & Design Ideas Inspired by Asia- One of the most compelling aspects about Asian inspired design is that you see things for the mood they create. Asian design is simple and at the same time very compelling, always with a nod to nature & reflecting it's beauty. Another important part is that attention is given to proportion, balance, texture, and tone. Colors that are rich in saturation and deep are very compelling. They  grab your attention while staying grounded at the same time. Common color themes are Silver & Lotus (usually white or red, & sometimes blue lotus) .  Golden & Fig or green tones that are used in combination  with some shade of a warm yellow tone.  For the deeper tones Coffee Bean colors are used as well as Black Lacquer. Texture and use of  contrasting materials are often the focus of Asian design. Simplicity at it's best! Try incoporating some Asian design & color into your home...it's a fresh approach that never goes out of style.

This bath is a great example of lotus & fig colors
with coffee browns to ground the space and give it warmth.
 
Golden & fig tones make this outdoor space cozy, nature
helps out with all the lovely green tones. The space has
a great sense of peace. (photo from comfortablehomedesign.com)

East meets West! Nice way to incorporate the clean lines
of Asian style with a contempory home.
(photo from elledecor.com)


This bathroom offers a great mix of materials. The warm smooth
use of the wood against the cool crisp white ceramic tub and all this
alongside the glass and brick wall. The wall of glass with all the
beautiful greens adds a feeling of peace. A real oasis!
(photo courtesy of  lookbook.elledecor.com)


Nice pop of red color in this room with this chest! 
Lastly....this great Asian Restaurant sums it up by showing all of the inspiring ideas...what a wonderful mood that has been created by the use of color, texture, and lovely materials.


(photo from designshuffle.com)


So the next time you need to be inspired to create a wonderful space in your home try adding some colors inspired by Asia. 

Leave a comment and let me know what inspires you. Thanks for reading by blog!

Nice way to add some black Laquer!

Tuesday, April 3, 2012

10 RePurposing Design Ideas

10 Repurposing Ideas: to refresh your rooms interior without spending a lot of money...take what you already have and make it into something new to you!

1. LAMPS- change the lampshade,  add some trim to the shade, or spray paint the base for an updated look. (photo from cornerhouse.blogspot.com)
Sometimes just adding a lamp to a room can do wonders!

2. HEADBOARD- use existing headboard or build a upholstered one by adding padding and fabric to revamp your room. Painted wood doors or shutters can be another design option. Be creative!

Nailheads add another dimension and custom detail


Great way to add a punch of color!
 

                 3. RE-UPHOLSTER a chair or bench in a bedroom and paint room to coordinate with it.


Simple makeover! ( photo from ohdeedoh.com)


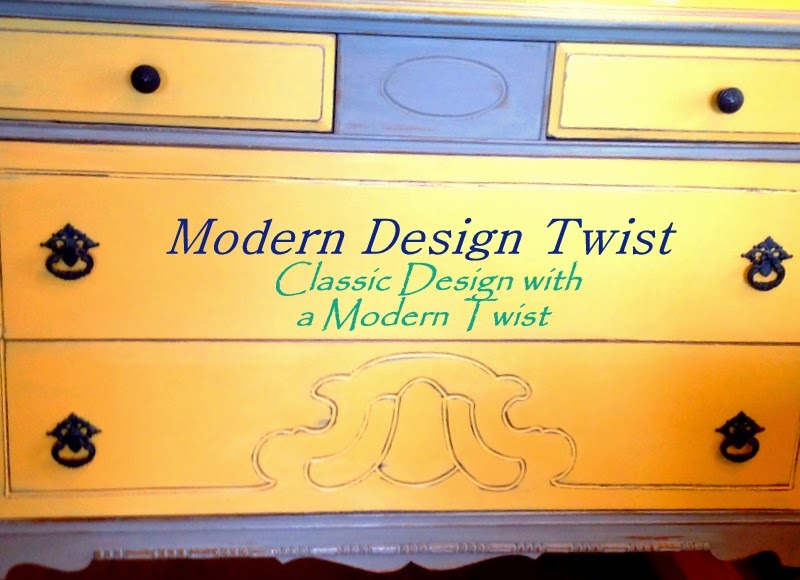
4. PAINT BEDROOM DRESSER- change the color and add new hardware, you can even spray paint the old ones as well. This works great if you add a non-matching piece to a room...make it an accent!

hardware makes all the difference! (photo from adesignstory.com)

5. REMOVE OLD OUTDATED ARTWORK- instead create a gallery wall with framed photo's of family & friends, or special trips. Also, try taking down art and moving it to a different space.


Great versitility when looking for a change.
With a gallery wall you can use a variety of styles and sizes to fit the location. Just make sure something ties them all together like color, style, material, matte color etc.

6. UPDATE ACCESSORIES- try changing the color by painting over them, add gold or silver accents to change them up, or paint with 2 different finishes & distress them with sandpaper to give them more character. Distressing gives the room a more relaxed style.


Metal finishes add sparkle and reflect light! Silver accents pull the room together nicely!


7. PILLOWS & MORE PILLOWS- if you have an old sofa (most of us do!) add or change the accent pillows, if yours are too plain add some trim, or if a change is due, re-cover with close-out fabric from your local fabric store.

add some color & geometric designs for fun!


A simple pop of color or texture can be all you need to freshen up your living room!

8. ADD SOME GREENERY- take a vase/pot and add a plant for a empty corner, or put a console table in front of a window with a green plant on top. Plants clean up the air in a room as well as adding some life.

green plants help to bring the outdoors in! (photo form apartmenttheraphy.com)

9. RE-COVER YOUR DINING ROOM CHAIRS- by re-covering your chair seats you only need about 1/2 yard per chair (consider the pattern repeat), possibly some padding if the cushions are worn & a nail gun. Patience helps too! If your room is in need of a bigger change consider either painting the table a different color or the chairs. With a contrast between the two you will have a more dynamic space.

 Great color huh! Chair fabric pulls together the table and chairs nicely. (photo courtesy of: thesassypepper.blogspot.com)

and finally...

10. RE-DO BOOKSHELVES- storage bins and large baskets are great for storing bookshelf clutter. You know the stacks of books, cd's, dvd's, photo books, games, small collections of craft stuff, magazines, well the list could go on. By clearing the clutter it makes the room feel more restful...and you will feel more relaxed!

It's amazing what you can do with the things you already own, it just takes some imagination and a bit of creativity...but the results are worth it!

...until next time!
Please post a comment I would love to hear what you think!